Build up a Hyper-Converged Proxmox/Ceph Cluster

Unleash the power of a robust and high-performance virtualization environment by building a hyper-converged Proxmox/Ceph cluster. In this comprehensive guide, I will walk you through the process of setting up a highly available (HA) and lightning-fast Full Mesh communication channel dedicated solely to Ceph and internal cluster traffic. This segregated network will ensure optimal performance and security, keeping your management network free from the cluster's internal data flow.
My Setup
For my cluster setup, I've chosen three repurposed HP EliteDesk 800 G5 Mini machines. These compact devices pack a powerful punch, capable of handling multiple virtual machines and containers per node while maintaining low power consumption, minimal noise levels, and occupying a tiny footprint – perfect for building a space-efficient hyper-converged infrastructure.
One of the key advantages of these HP EliteDesk 800 G5 Mini systems is their storage flexibility. Each unit comes equipped with two m.2 NVMe slots and one SATA port. In my build, I've utilized the SATA port for a 120GB SSD to host the Proxmox operating system, while a 1TB NVMe drive from Western Digital serves as the primary storage for virtual machines and containers.
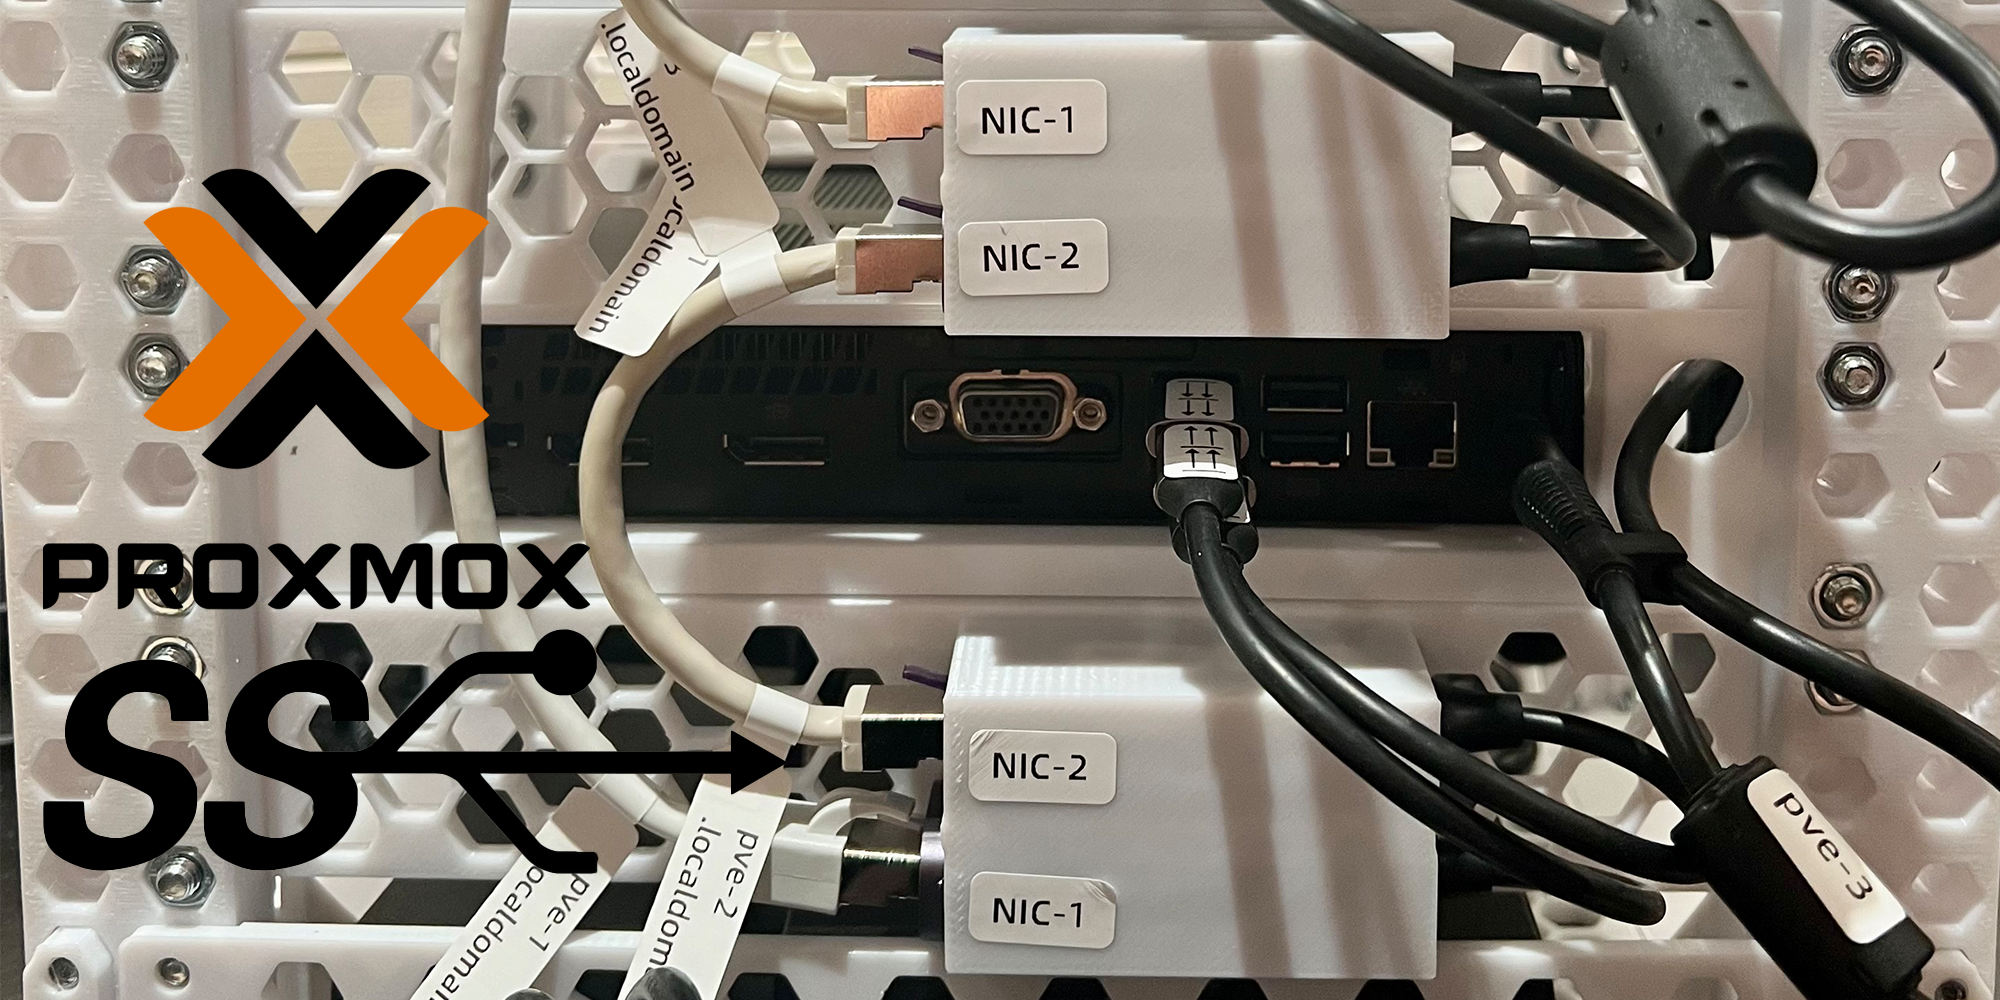
However, these mini workhorses do have one limitation: a single built-in network interface card (NIC). While it's possible to add an additional NIC via the HP FlexPort, the available options are limited to 1Gbps speeds (at least for Gen 5 of the EliteDesks) and can be quite costly, often rivaling the price of two 2.5Gbps USB NICs. To overcome this challenge, I've opted for the UGREEN 2.5Gbps USB NICs, which will provide ample bandwidth for the Ceph and Proxmox infrastructure data transfers within the cluster's ring/mesh network.

Pre-Reqs
- At least three servers for the HCI cluster, with one empty Drive for CEPH.
- Fresh installation of Proxmox 8.0 or later.
- The "No-Subscription" or another update repository is set up on each server.
- Servers have been updated with the latest patches using apt or apt-get (I would recommend the Post-Install Scripts from tteck for this).
- Servers are connected to a management network, and you can access the Proxmox GUI and root SSH.
- Cluster links between nodes are connected in a ring topology as shown in the diagram in step 1.
- The Proxmox cluster has not yet been configured.
- Ceph has not been installed or configured.
- Hosts have no (running) VMs, so you can perform reboots, etc.
Also, make a plan on naming your cluster, the nodes, their IP & FQDN. I have used the following values:
Cluster Name: Homelab

Node 1:
- Name: pve-1
- FQDN: pve-1.localdomain
- Management IPv4 Address: 192.168.2.201/23
- Cluster IPv6 Address: fc00:1
- Cluster Devices: enx68da73af6970 & enx68da73af67b8

Node 2:
- Name: pve-2
- FQDN: pve-2.localdomain
- Management IPv4 Address: 192.168.2.202/23
- Cluster IPv6 Address: fc00::2
- Cluster Devices: enx68da73af68eb & enx68da73af6796

Node 3:
- Name: pve-3
- FQDN: pve-3.localdomain
- Management IPv4 Address: 192.168.2.203/23
- Cluster IPv6 Address: fc00::3
- Cluster Devices: enx68da73af6970 & enx68da73af67b8
Setup
1. Connect the Network
Your network configuration should look like this:
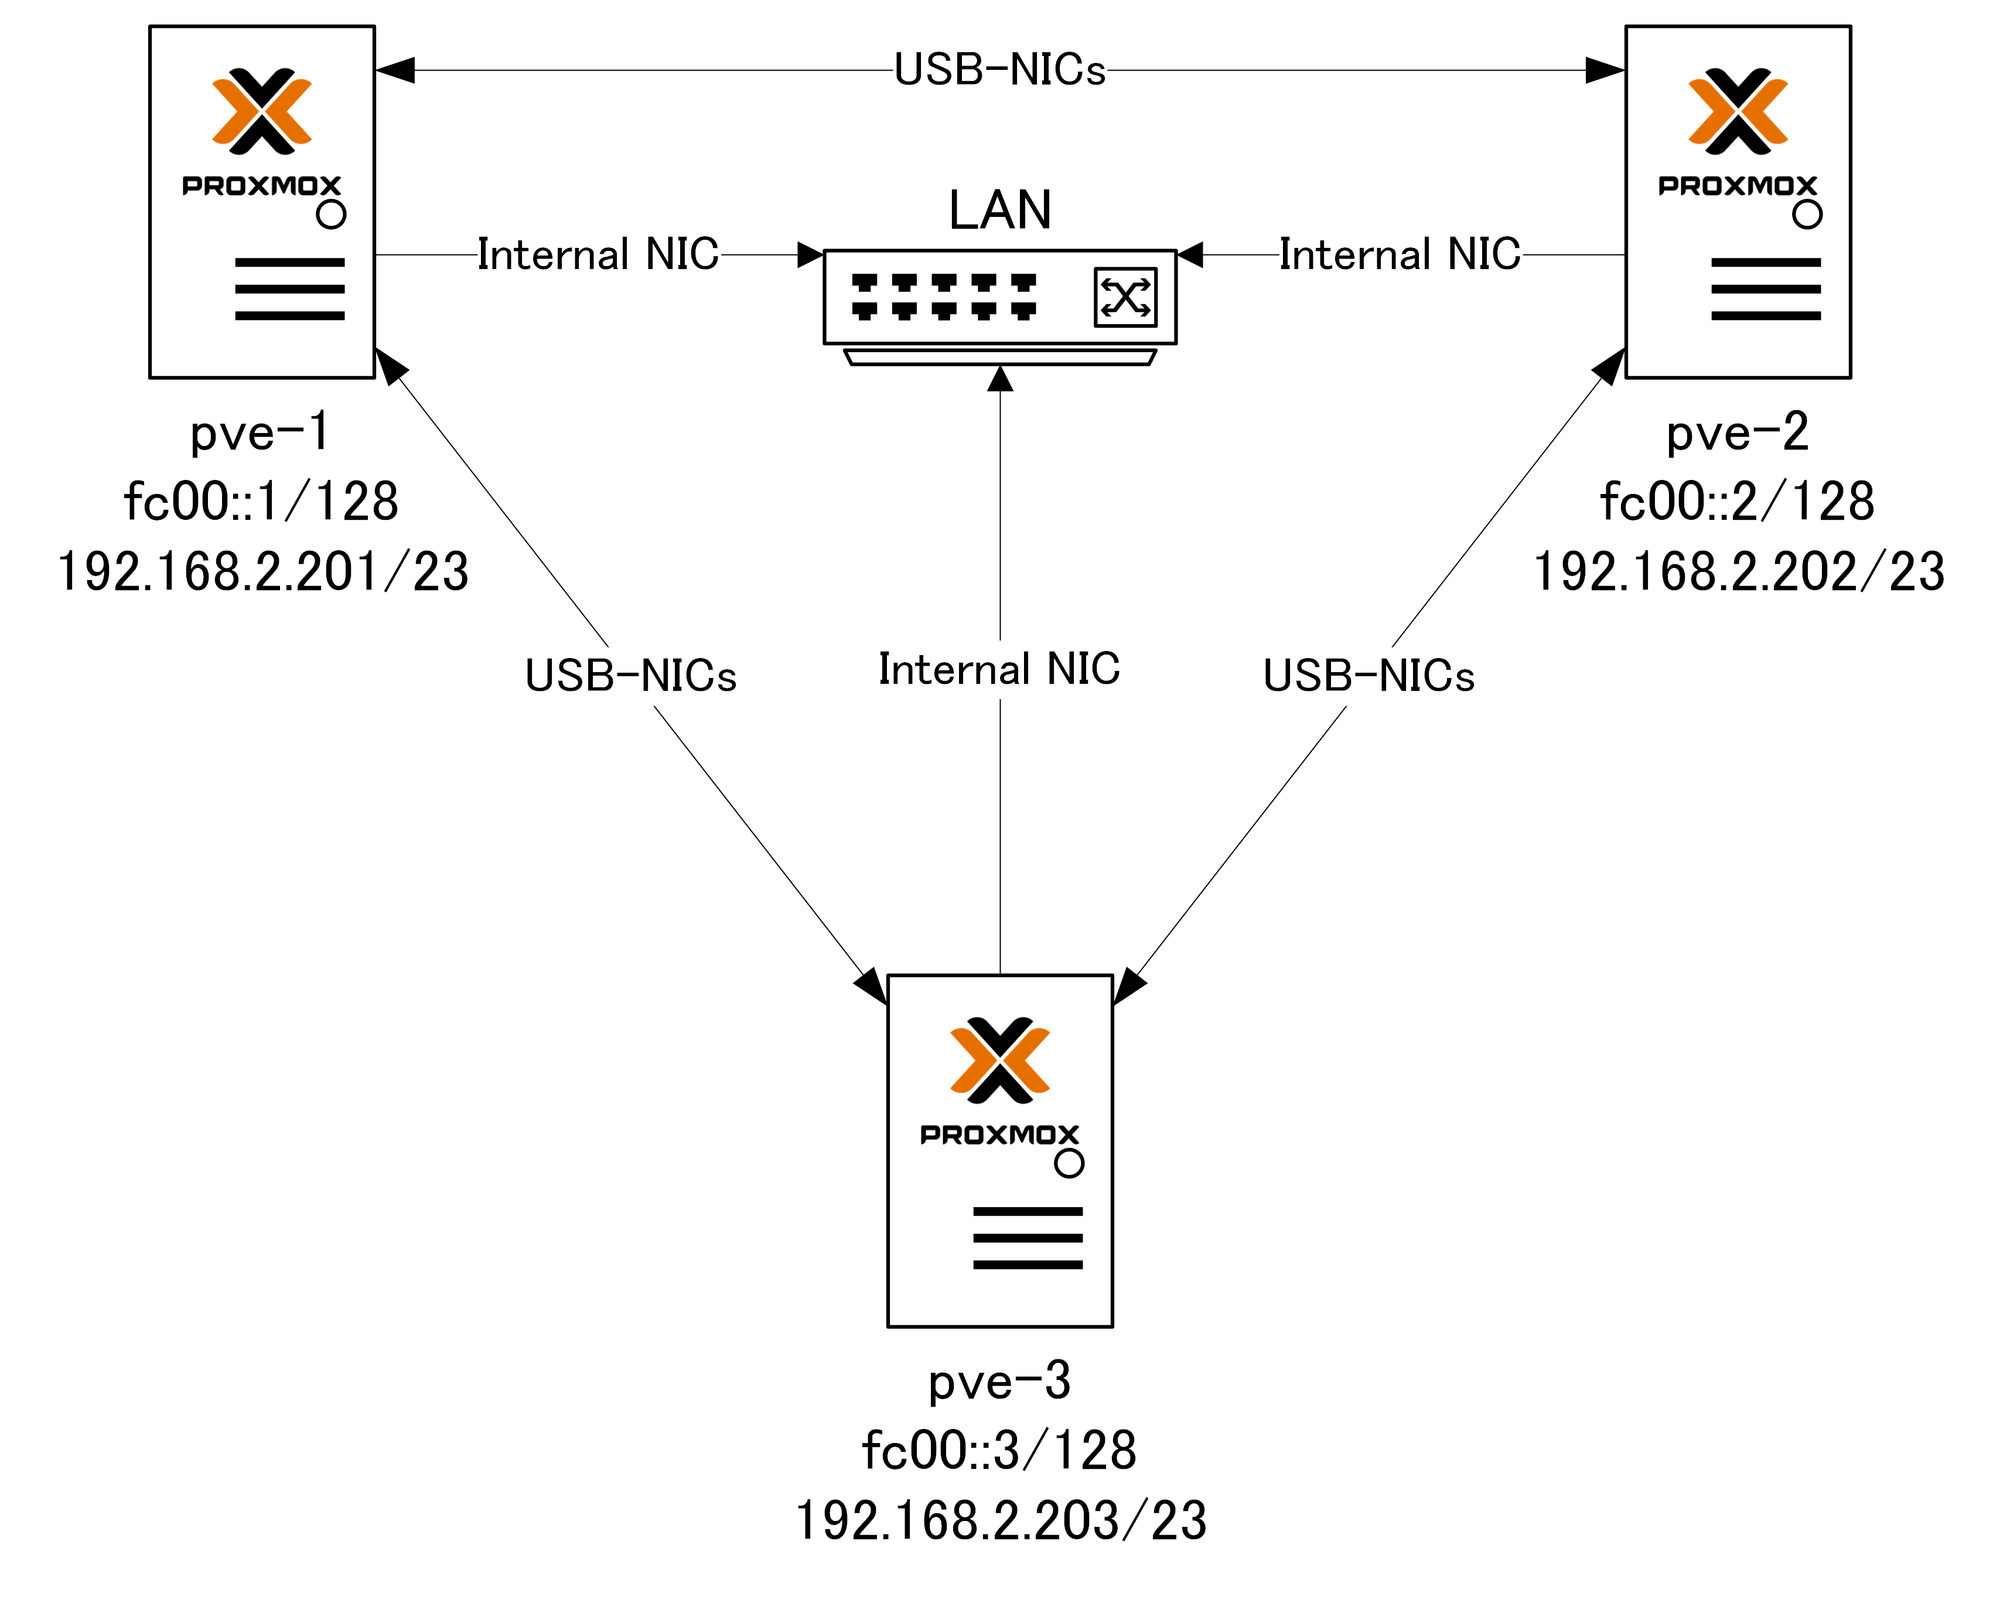
To establish the high-speed mesh network, each server in the cluster is interconnected with the others using the UGREEN 2.5Gbps USB NICs. These dedicated NICs form the backbone of the cluster's internal communication, handling all Ceph and Proxmox infrastructure traffic. Meanwhile, the built-in NICs on each server are utilized for the management network, allowing seamless integration with my local area network (LAN) for administrative purposes.
To verify that the mesh network is connected correctly, you can leverage the powerful lldpctl tool. This utility scans and reports on the connected devices, providing crucial insights into the setup's integrity. If everything is set up properly, the output from lldpctl should resemble the following, including at least two neighbors:
LLDP neighbors:
-------------------------------------------------------------------------------
Interface:    enx68da73af67aa, via: LLDP, RID: 9, Time: 0 days, 00:00:28
  Chassis:
    ChassisID:    mac 04:0e:3c:a6:4d:24
    SysName:      pve-2.localdomain
    SysDescr:     Debian GNU/Linux 12 (bookworm) Linux 6.5.13-5-pve #1 SMP PREEMPT_DYNAMIC PMX 6.5.13-5 (2024-04-05T11:03Z) x86_64
    MgmtIP:       192.168.2.202
    MgmtIface:    5
    MgmtIP:       fe80::265a:4cff:feb9:f8ff
    MgmtIface:    1
    Capability:   Bridge, on
    Capability:   Router, off
    Capability:   Wlan, off
    Capability:   Station, off
  Port:
    PortID:       mac 68:da:73:af:68:eb
    PortDescr:    enx68da73af68eb
    TTL:          120
    PMD autoneg:  supported: no, enabled: no
      MAU oper type: 2p5GigT - 2.5GBASE-T Four-pair twisted-pair balanced copper cabling PHY
2. Create Loopbacks
To configure the dedicated cluster network interface on each node, connect via SSH and open the /etc/network/interfaces file for editing:
nano /etc/network/interfaces
Within this file, add the following interface definition, customizing the IP address for each respective node:
auto lo:0
iface lo:0 inet static
  address fc00::<node_number>/128
Replace <node_number> with the corresponding number for the specific node:
- For node 1, use
::1 - For node 2, use
::2 - For node 3, use
::3 - Continue this pattern for any additional nodes in the cluster.
This unique IPv6 address will serve as the dedicated IP for Ceph and Proxmox cluster services on that particular node, facilitating seamless communication within the mesh network.
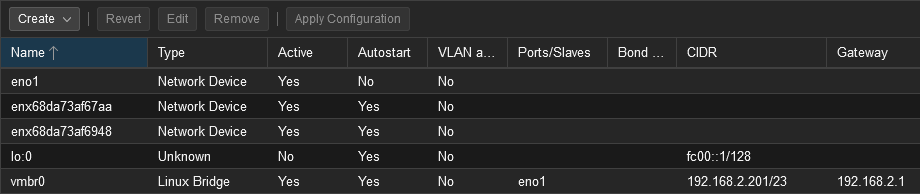
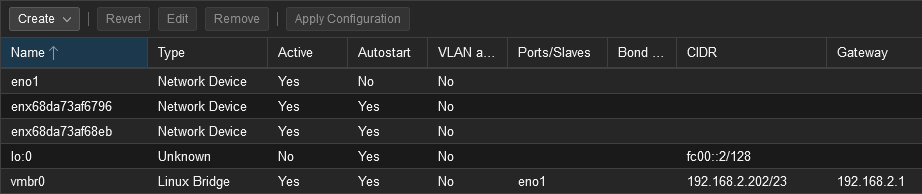
After making the necessary changes, the relevant section in /etc/network/interfaces should resemble the following:
auto lo:0
iface lo:0 inet static
  address fc00::1/128
Ensure that you repeat these steps on each node in the cluster, substituting <node_number> with the appropriate value for that specific node. By doing so, you'll establish a consistent and organized IPv6 addressing scheme for the dedicated cluster network, enabling optimal performance and isolation from the management network for Ceph and Proxmox cluster traffic.
Save and close the file. Restart network services to apply the changes:
systemctl restart networking.service && systemctl status networking.servicNow, your Network configuration should look like this:

3. Enable IPv6 Forwarding
In a mesh network configuration, there may be scenarios where some nodes need to communicate with each other by routing through a neighboring node when the cluster ring is broken. To enable this capability, we need to allow IPv6 forwarding in the Linux kernel on each node.
Open the sysctl.conf file for editing:
nano /etc/sysctl.confLocate the line containing #net.ipv6.conf.all.forwarding=1 and uncomment it by removing the preceding #:
net.ipv6.conf.all.forwarding=1Save the changes and exit the text editor. Then, to apply the new configuration immediately, execute the following command:
sysctl net.ipv6.conf.all.forwarding=1Verify that the Linux kernel is now set to forward IPv6 packets:
sysctl net.ipv6.conf.all.forwardingThe output should display:
net.ipv6.conf.all.forwarding = 14. Set Up Free Range Routing (FRR) using OSPF
Here's a rewritten version of the instructions:
To enable dynamic routing capabilities within the hyper-converged Proxmox/Ceph cluster, we'll leverage the Free Range Routing (FRR) software. Follow these steps on each node:
- Install the FRR package:
apt install frr- Open the FRR daemons configuration file for editing:
nano /etc/frr/daemons- Locate the line containing
ospf6d=noand change it toospf6d=yes:
ospf6d=yes- Save the changes and exit the text editor. Then, restart the FRR service to apply the new configuration:
systemctl restart frr.serviceBy installing and enabling the OSPFv6 daemon (ospf6d) within FRR, you're setting the stage for dynamic routing within the cluster's dedicated IPv6 network. This will allow the nodes to automatically discover and establish efficient routes for communication, ensuring optimal performance and resilience.
Repeat these steps on every node in the cluster to ensure consistent FRR configuration and seamless dynamic routing capabilities across the entire mesh network.
5. Configuration
To enable dynamic routing capabilities within the hyper-converged Proxmox/Ceph cluster, we'll leverage the Free Range Routing (FRR) software and configure the Open Shortest Path First (OSPF) protocol for IPv6 networks. Follow these steps on each node:
- Enter the FRR shell:
vtysh- Check the current configuration:
show running-config- Enter the configuration mode:
configure- Apply the following configuration, replacing
0.0.0.1with the appropriate node number. For node 2, use0.0.0.2, and for node 3, use0.0.0.3. Don't forget to update the network interface names (NICs) accordingly.
router ospf6
 ospf6 router-id 0.0.0.1
 log-adjacency-changes
 exit
!
interface lo
 ipv6 ospf6 area 0
 exit
!
interface enx68da73af67aa
 ipv6 ospf6 area 0
 ipv6 ospf6 network point-to-point
 exit
!
interface enx68da73af6948
 ipv6 ospf6 area 0
 ipv6 ospf6 network point-to-point
 exit
!
By configuring FRR with the OSPFv6 dynamic routing protocol, you're enabling the nodes to participate in the dedicated IPv6 network. The unique router-id (0.0.0.1, 0.0.0.2, 0.0.0.3, etc.) identifies each node within the routing domain, while the specified network interface (enp0s31f6 in the example) is the interface participating in the OSPFv6 area.
- Exit the configuration mode:
end- Save the configuration:
write memory- Exit the FRR shell:
exit- Ensure that you repeat this process on every node in the cluster, adjusting the router-id and network interface names as needed.
6. Verification
After configuring FRR with the OSPFv6 dynamic routing protocol on all nodes, verify the successful establishment of OSPF6 neighbor relationships and routing information.
vtysh -c 'show ipv6 ospf6 neighbor'
You should see two neighbors listed for each node, similar to the following output:
root@pve-1:~# vtysh -c 'show ipv6 ospf6 neighbor'
Neighbor ID     Pri    DeadTime    State/IfState         Duration I/F[State]
0.0.0.2           1    00:00:39     Full/PointToPoint    02:02:33 enx68da73af67aa[PointToPoint]
0.0.0.3           1    00:00:30     Full/PointToPoint    01:49:16 enx68da73af6948[PointToPoint]
This output confirms that each node has successfully established OSPF6 neighbor relationships with the other nodes in the cluster.
View the IPv6 routing table populated by FRR by running:
vtysh -c 'show ipv6 route'The IPv6 addresses of your neighbors should be listed in the routing table as OSPF routes, indicating that the dynamic routing protocol has learned and installed the appropriate routes for communication within the mesh network.
7. Test OSPF Routing & Redundancy
We should now have full reachability between our loopback interfaces. Let's test it with:
- Ping every node from every node:
ping fc00::1. Replace the IP to make sure you have reachability between all nodes. - Check your neighbors are all up:
vtysh -c 'show ipv6 ospf6 neighbor'. - Pick one of your nodes and shut down one of your 10G links:
ip link set enx68da73af67aa down. Alternatively, you can pull out a cable for a real-world test. However, do NOT do this on all nodes, just on one. - Check that the link is down:
ip link. - Check your neighbors; you should only have one on this node:
vtysh -c 'show ipv6 ospf6 neighbor'. - Ping every node from every node AGAIN:
ping fc00::1. This should still work, as you will route through one of your nodes to reach the detached one. - Check your routing table:
ip -6 route. You will see the links used to reflect the routing path. - Bring the downed link back up:
ip link set eno1 up. Or, plug the cable back in. - The routing table should change back after approximately 15 seconds.
- Ping every node from every node ONE LAST TIME:
ping fc00::1. Make sure the system is working properly.
By testing the reachability, monitoring the OSPF6 neighbor relationships, simulating link failures, and verifying the routing table updates, you can validate the dynamic routing capabilities and ensure that the hyper-converged Proxmox/Ceph cluster can maintain connectivity and adapt to network changes, providing a resilient and high-performance environment for your virtualization needs.
8. Update the Hosts File
To ensure proper name resolution and verify the stability of the hyper-converged Proxmox/Ceph cluster, follow these steps:
- Edit the hosts file:
nano /etc/hosts(or use the Proxmox GUI). - Add the following lines to the file, mapping the IPv6 addresses to the respective node names:
fc00::1 pve-1.localdomain pve-1
fc00::2 pve-2.localdomain pve-2
fc00::3 pve-3.localdomain pve-3- Ping each host by name and ensure that the IPv6 address is used.
- Reboot each server.
- Once the servers are back online, ping each host by name again and verify that the IPv6 address is still being used.
- Perform all the routing and redundancy tests you conducted previously, including checking OSPF6 neighbors, simulating link failures, and verifying routing table updates. Ensure that a reboot does not break any of the established configurations or capabilities.
Additionally, repeating the routing and redundancy tests after the reboot ensures that the dynamic routing capabilities remain intact and that the hyper-converged Proxmox/Ceph cluster can maintain connectivity and adapt to network changes, even after a system restart.
This comprehensive testing process helps verify the stability and resilience of your virtualization environment, providing confidence in the robustness of your hyper-converged infrastructure.
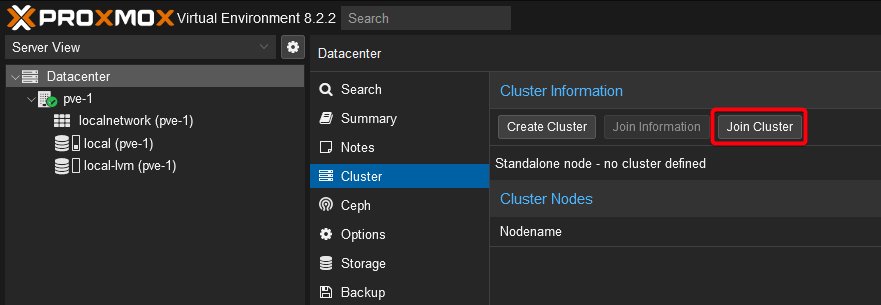
9. Setting up the Proxmox Cluster
To kick off your homelab setup, start by creating a cluster on PVE01 using the Proxmox GUI. Name this cluster "Homelab" to set the tone for your virtualization endeavor.

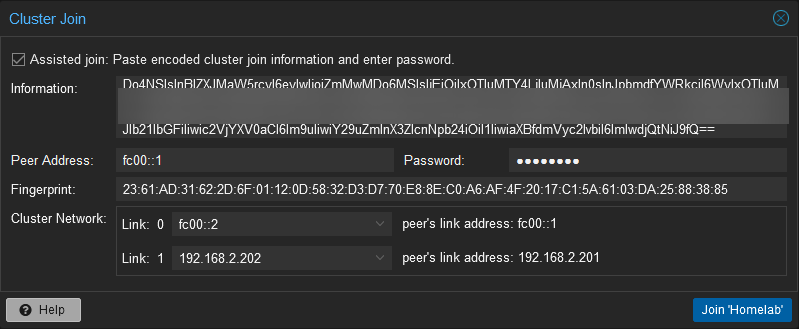
Next, configure the cluster network settings. Assign Link #0 to the fc00:1 interface, dedicated for cluster communication. Then, add a second link (Link #1) and assign it the IPv4 management IP for administrative access.

Once the initial cluster is established, you'll have the necessary information to join additional nodes.
During this process, ensure you select the proper Cluster Network addresses to maintain seamless connectivity.
Note: The screen might temporarily blank out during the joining process. If this happens, give it a minute and check the first node to see if the joining node is present. Then, refresh the browser on the joining node to regain access. You can ignore/accept the certificate warning. This comes trough the join to the cluster.
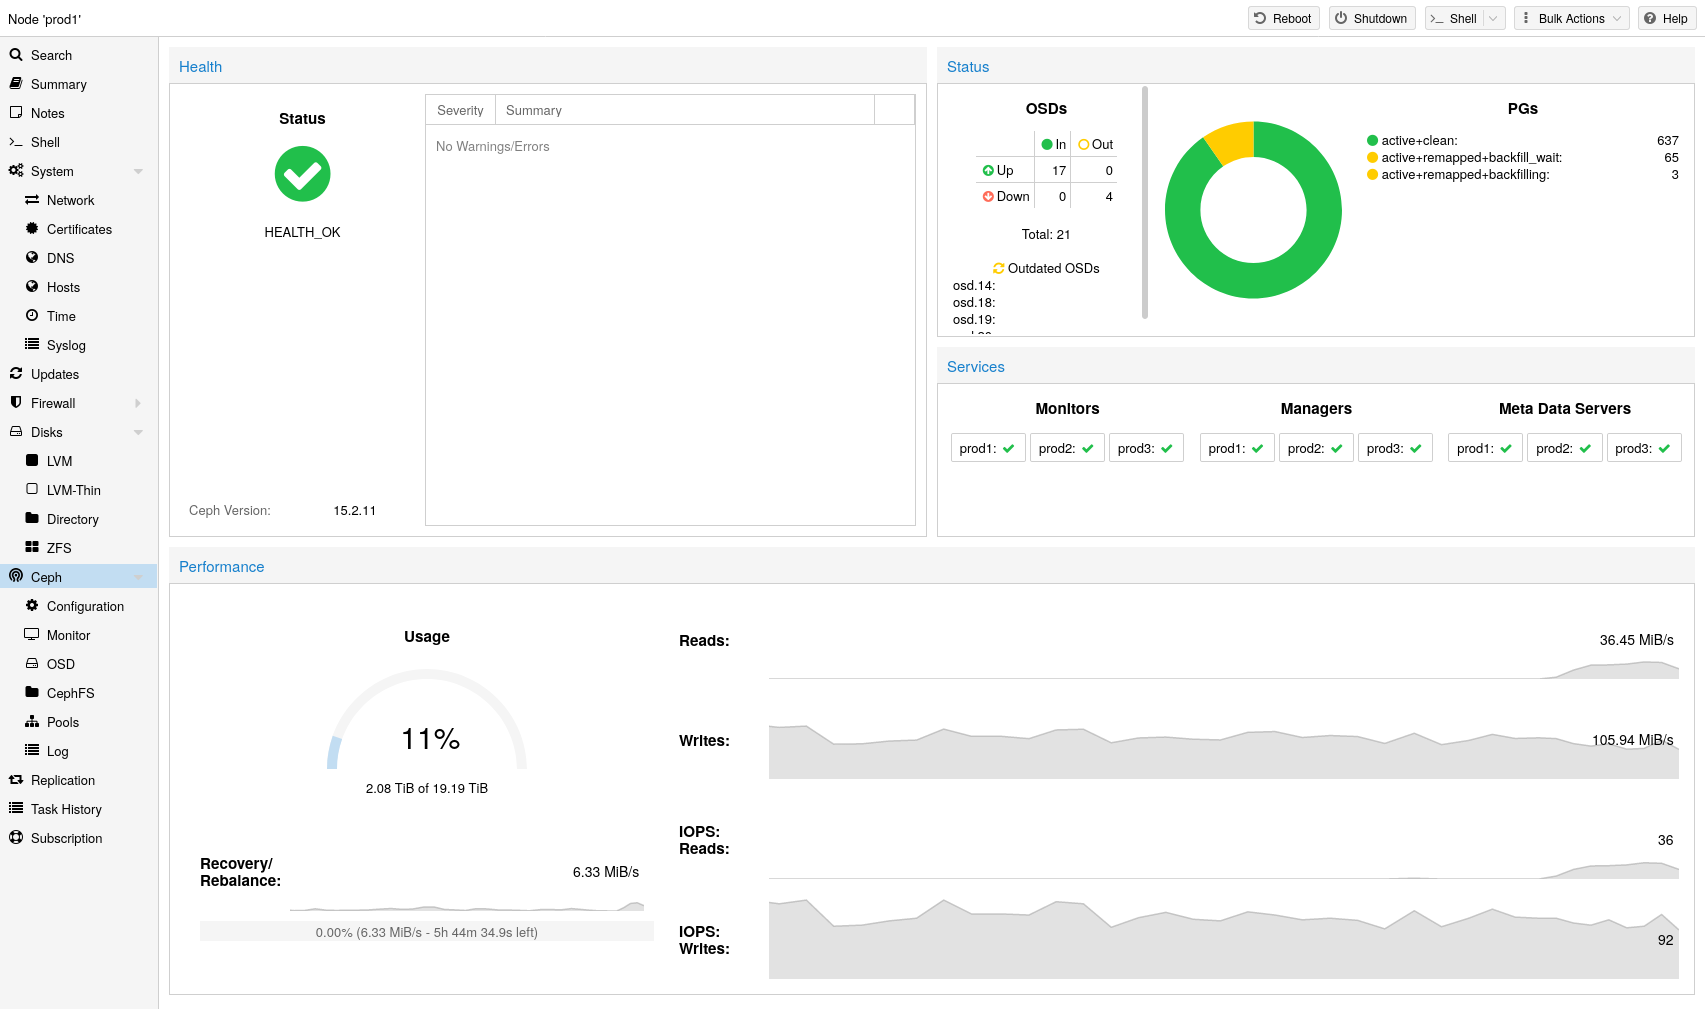
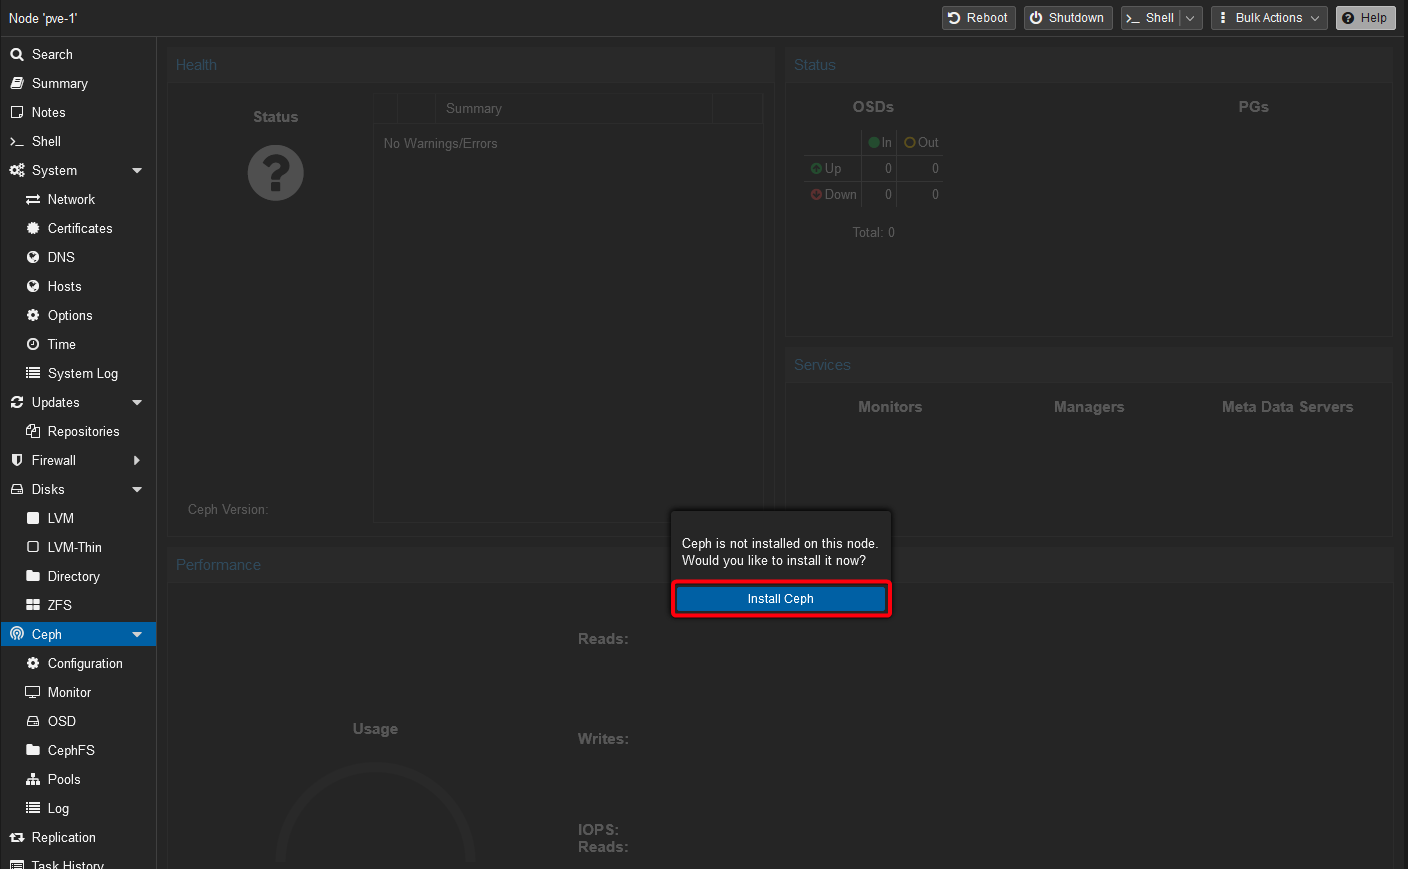
10. Building the Ceph Cluster
To harness the power of Ceph as your software-defined storage solution, follow these steps to build the Ceph cluster on your Proxmox homelab:
- Install Ceph on PVE-1 from the Proxmox GUI without a subscription. Navigate to the PVE-1 node on the left side, choose the "Ceph" option, and click "Install Ceph."
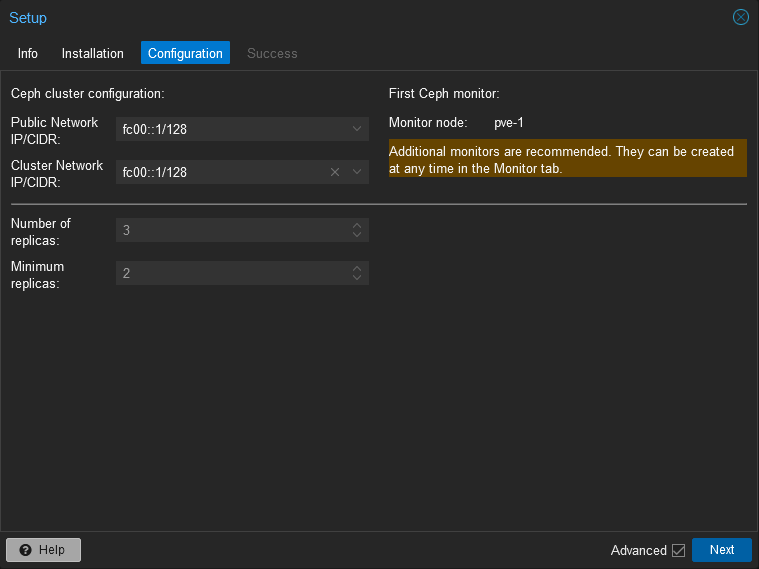
- Set the desired version for your cluster installation. Ensure you select the "No-Subscription Repository" option, then click "Start Reef Installation" to initiate the process.

- Confirm the installation by entering "y" when prompted, then patiently wait for the installation to complete before pressing "Next."

- Choose your IPv6 NIC (fc00::1/128) as the designated interface for Ceph communication and confirm your selection by pressing "Next."
- At this stage, do not install Ceph on the other nodes yet. We'll address that in a later step once the initial setup on PVE-1 is complete.
- Close the Wizard by clicking on "Finish".
- Edit the Ceph configuration file on the first Proxmox node (pve-1) only:
nano /etc/ceph/ceph.conf- Change these two lines:
cluster_network = fc00::1/128
public_network = fc00::1/128
To this:
cluster_network = fc00::/64
public_network = fc00::/64- Save the file and exit the editor.
- Restart Ceph on the first node:
systemctl restart ceph.target - Install and configure Ceph on the additional nodes.
11. Finishing the Setup
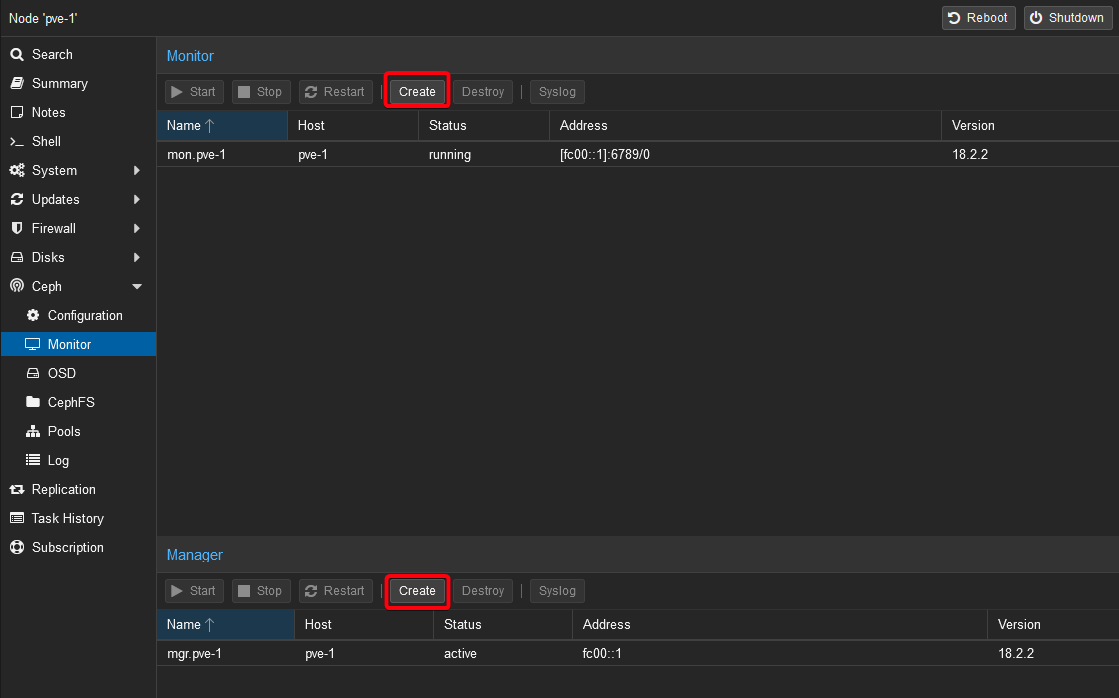
Before the cluster can be used, monitors and managers need to be added, and OSDs (disks) with their Metadata Servers need to be set up.
Monitors
The Ceph Monitor (MON) maintains a master copy of the cluster map. For high availability, at least 3 monitors are needed. Monitors play a crucial role in tracking the status and configuration of the Ceph cluster, monitoring OSDs, distributing cluster information maps to all nodes, and making significant decisions within the cluster. You can create the necessary service under the Ceph -> Monitor section of the Proxmox interface.

Managers
The Ceph Manager daemon runs alongside the monitors. It provides an interface to monitor the cluster, manage services, offer a dashboard for monitoring cluster performance, health, and usage, support dynamic configuration updates without requiring downtime, and generate reports on the health and condition of the Ceph cluster. You can create the necessary service under the Ceph -> Monitor section of the Proxmox interface.
OSDs
In a Ceph cluster, data is stored and managed by Object Storage Daemons (OSDs). Each OSD is associated with a single raw disk (not part of a RAID array or partitioned). This one-to-one mapping between OSDs and disks ensures efficient and dedicated storage management.
Each OSD communicates directly with the Ceph monitors and other OSDs within the cluster, facilitating data replication, consistency, and availability across the distributed storage environment.
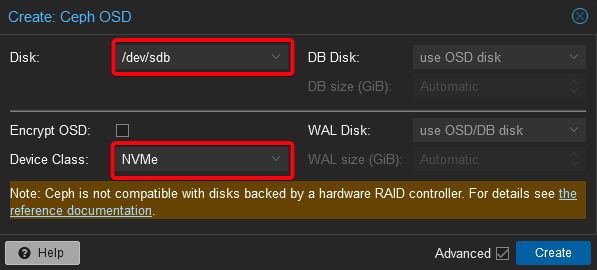
To incorporate a new disk into your Ceph cluster and create a new OSD, follow these steps:
- Navigate to the "Create: OSD" section in the Proxmox interface.

- Select the disk you wish to dedicate as an OSD. Also, verify that you have chosen the correct drive type. In my case, since i´m using NVMe drives, i will choose
NVMe.
Enabling CephFS in the Cluster
To unlock the full potential of your hyper-converged Proxmox/Ceph cluster, the final step is to enable the CephFS distributed file system. CephFS provides a reliable and scalable storage solution, allowing you to seamlessly share data across multiple nodes within the cluster.
To enable CephFS, follow these steps:
- Navigate to the "Ceph -> CephFS" section in the Proxmox interface.
- Before creating the CephFS file system, you must first configure the Metadata Servers. These servers are responsible for managing the file system metadata, ensuring efficient data access and consistency.
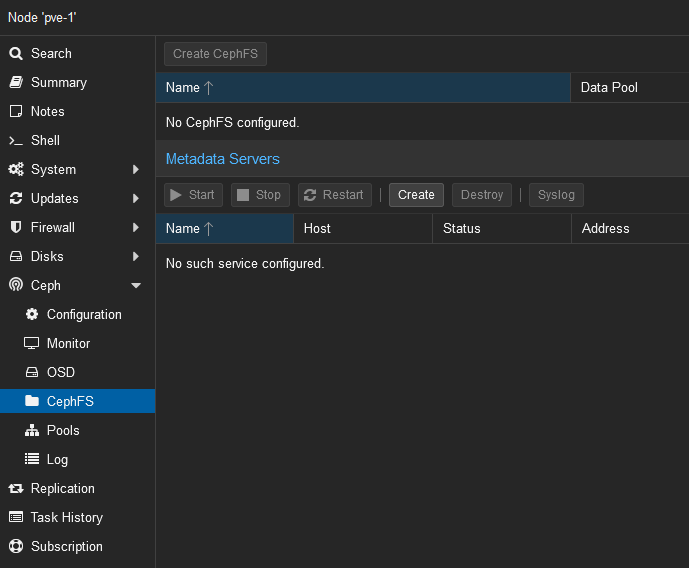
- Once the Metadata Servers are configured, you can proceed to create the CephFS file system itself.
- Click on the "Create CephFS" button and provide a descriptive name for your file system.
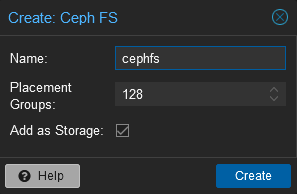
- Review the other configuration options, and unless you have specific requirements, you can leave them at their default values.
- Confirm the creation of the CephFS file system by clicking the "Create" button.
With CephFS integrated into your hyper-converged infrastructure, you can confidently deploy applications and services that require shared storage, knowing that your data is securely stored and accessible across the entire cluster.
Conclusion:
Congratulations on successfully building a robust and high-performance hyper-converged Proxmox/Ceph cluster with a dedicated IPv6 mesh network and dynamic routing capabilities. This setup segregates cluster traffic from the management network, ensuring optimal performance and security while providing resilience and fault tolerance through its redundant configuration.
Throughout this guide, you configured a Full Mesh IPv6 network, enabled IPv6 forwarding, and set up dynamic routing with FRR and OSPFv6. As a result, you've established a highly available and scalable virtualization environment that can adapt to network changes and maintain connectivity, even in the face of link failures.
The powerful combination of Proxmox, Ceph, the dedicated mesh network, and dynamic routing unlocks a hyper-converged infrastructure capable of handling multiple virtual machines and containers while ensuring efficient storage management and data transfer within the cluster.
With this setup, you can confidently deploy and manage virtualized workloads, knowing your hyper-converged Proxmox/Ceph cluster is built on a foundation of performance, resilience, and scalability. Embrace this high-performance, fault-tolerant, and scalable virtualization environment, and unlock new possibilities for your IT infrastructure.
If you've utilized the UGREEN USB NICs featuring the RTL8156 chipset in your setup, be sure to check out my complementary article on automating the initialization of these NICs during system power cycles. This additional guide will ensure seamless network connectivity and eliminate the need for manual intervention after every reboot or power outage. Streamline your hyper-converged Proxmox/Ceph cluster operations with this handy resource.
Inspired by: